
My 76 superior has aftermarket midlone body trim and I can get the orginal aluminum trim but all the rivets that hod it on have been sanded off, could I use an adhesive to put it on? will it hold? if not how should I put it on?

You are using an out of date browser. It may not display this or other websites correctly.
You should upgrade or use an alternative browser.
You should upgrade or use an alternative browser.
aluminum body trim?
- Thread starter Chris Elzie
- Start date
one would need to see what your talking about. I have seen a lot of this kind of stuff. but off hand I would say replace the rivets would be the way to go. they held it on in the first place they would do so again. the glue on fall off style will only hold when you don't want it to. the expansion and contraction of the aluminum vers the steel vers the double edge tape in a long run will work it loose. the 3m molding glue will dry out and fall off in about 2 years.
http://www.flickr.com/photos/23047822@N04/2445936938/
Here is a pic of the ambulance down the middle of the body where there is the normal aluminum trim it has the trim with the rubber insert.
Here is a pic of the ambulance down the middle of the body where there is the normal aluminum trim it has the trim with the rubber insert.
The original trim was stainless steel, and held on with plastic tabs that were secured with spot welded studs with heads. Most of the aluminum trim that had the vinyl insert was held to the body with either screws or if the installer was lazy, then rivets.
Isn't this the car that you sold for parts??
thanks
Paul
Isn't this the car that you sold for parts??
thanks
Paul
No the one I sold for parts was a 73 this one was in much better shape. I can get the orginial stainless steel trim to go back on it but I just cant figure out how to attach it.
Rocky Fluegge
PCS Member
From my past experiences, you can re weld on the studs if you can find a body shop that has a unispotter stud gun. I have the attachment and the heads. The problem is it needs to be bare metal there to weld it. if it is in the paint stage no problem. The other option that i know of but it has been a while that i have used them or seen them. There are screws for trim clips that have a small head and a phillips screw cut in the top. You drill a small hole and screw them in and the clips will fit over them like the factory studs. The option of using double sided tape is ok but you need to use good 3m and clean the backing real good and the wax and dirt of of the car, and also make sure the steel is also at least 60 degrees. and it should work. All the new cars that is how everything is held on.
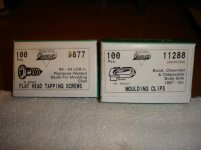
Mouldings
Here is the # for the screw in studs and 1 style of the clips,the clip is the correct style but may not be the exact width for your moulding.They make different widths of this style. This are Auveco #s you can find them on line or any good body supply store store should be able to get them for you.
Here is the # for the screw in studs and 1 style of the clips,the clip is the correct style but may not be the exact width for your moulding.They make different widths of this style. This are Auveco #s you can find them on line or any good body supply store store should be able to get them for you.
Attachments
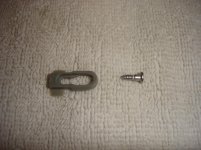
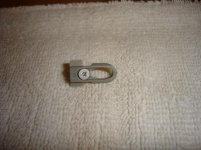
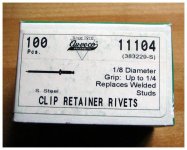
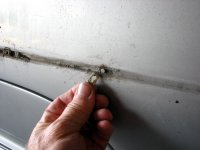
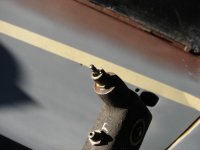
Auveco also has the attachment for your pop rivet gun to replace the studs with pop rivets. were superior and MM used the finger clip with the drive in lock, S&S used the standard gm with the welded on studs. the trim your showing was put on with a flush rivets as the Vinyl insert had to sit flush . a screw head would give you a bump. I put on my share of that stuff when it first came out
so here is the rivets that do the same as the screws. the nose piece on the rivet gun, the rivets in place with some of the nylon clips on and the molding on on a 73 S&S. the last is the push in style of clips MM and superior used. all the gm moldings are the same shape in the 70s all you have to worry about is how long it is. in fact I think from 66 to 76 they used the same belt line molding. I used the number 10318 clips on ths S&S
so here is the rivets that do the same as the screws. the nose piece on the rivet gun, the rivets in place with some of the nylon clips on and the molding on on a 73 S&S. the last is the push in style of clips MM and superior used. all the gm moldings are the same shape in the 70s all you have to worry about is how long it is. in fact I think from 66 to 76 they used the same belt line molding. I used the number 10318 clips on ths S&S
Attachments
-
 IMG_1601 picked up these.jpg56.7 KB · Views: 142
 -
 IMG_0205.JPG78.8 KB · Views: 141
 -
 IMG_1625 so here are the rivits in th etool. note the reses.JPG59.2 KB · Views: 138
 -
 IMG_1626 get thepeg in place and the clips on.JPG73.3 KB · Views: 137
 -
 IMG_1627 and we can make a back molding out of a door molding.JPG72.1 KB · Views: 140
 -
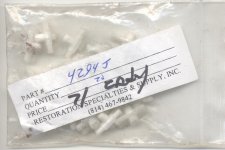 restoration specialties suply.jpg41 KB · Views: 138
Scott Avnaim
PCS Life Member
There was another trick to not useing a special rivit head. Unscrew the tip on the gun and use it backwards. The threaded end is small enough to fit into the moulding. I haven't done this in a long time since those mouldings are so old and you won't find them on late model cars. If you can go with new studs, you won't have holes to rust around. ") I, too have the gun and studs. I bought it about fifteen years ago and never opened the stud package since they are so outdated. I just use it for dents and shrinking metal.
I, too have the gun and studs. I bought it about fifteen years ago and never opened the stud package since they are so outdated. I just use it for dents and shrinking metal.
I, too have the gun and studs. I bought it about fifteen years ago and never opened the stud package since they are so outdated. I just use it for dents and shrinking metal.