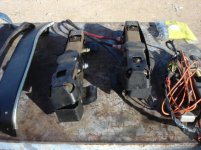
The front and rear actuators can be disassembled once they are removed from the track, but their cable attachment orientation is different for the front and rear actuators. The actuator that moves the sear front to rear, cannot be disassembled, so it needs to be cleaned in a different method. More on that later. Removal requires the seat be removed from the car first, and then removing the track assembly. Below are the pictures of what they look like internally.
This is an actuator prior to being disassembled in the down position.

Here it is in the fully extended position.

Here is what the inside looks like with the "guts" removed.

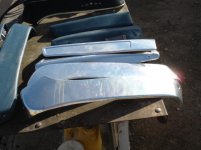
Here is what the "guts" consist of, laid out in the position that they would be assembled into the actuator....

Now that you see the internal parts, you can see that it isn't going to be very difficult to take them apart, clean, lubricate, and reassemble. One word of caution, make sure that you photograph each step, and that you don't get the convex washer in backward. Take each one apart, clean, and reassemble before doing the next. That way, if you loose your way, you have another to get you back on track. I used high temperature wheel bearing grease on mine, since you need to pack them fully, and you don't want the grease leaking out. There is no seals on the bottom of the actuators.
This is the actuator greased and reassembled. Note that there is a washer at the bottom that has a raised section. This raised section fits into a hole in the track to keep everything centered. Also, the washer is the last thing to go back on, since it needs to be off to get the gear shaft in. Also, note that the plastic retainers of the gear shaft are color coded. This is important, so you make sure that you have them properly oriented.

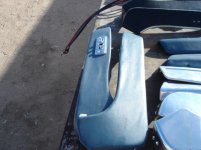
Here is what the actuator looked like when I removed it from the seat track. As you can see it was very crusted with sand and other debris. It wouldn't move up or down.

Here I have removed just the bottom washer exposing the bearing. This bearing is what makes everything move smoothly, and it is important that it isn't damaged. Clear it well and examine for any cracks, etc..

Next to come out is the worm gear shaft and retainers. Note there position on the shaft.

From this point, my hands were greasy, so I stopped taking pictures, and started cleaning. The following pictures you will see the parts, and how they go together.

This is an actuator prior to being disassembled in the down position.
Here it is in the fully extended position.
Here is what the inside looks like with the "guts" removed.
Here is what the "guts" consist of, laid out in the position that they would be assembled into the actuator....
Now that you see the internal parts, you can see that it isn't going to be very difficult to take them apart, clean, lubricate, and reassemble. One word of caution, make sure that you photograph each step, and that you don't get the convex washer in backward. Take each one apart, clean, and reassemble before doing the next. That way, if you loose your way, you have another to get you back on track. I used high temperature wheel bearing grease on mine, since you need to pack them fully, and you don't want the grease leaking out. There is no seals on the bottom of the actuators.
This is the actuator greased and reassembled. Note that there is a washer at the bottom that has a raised section. This raised section fits into a hole in the track to keep everything centered. Also, the washer is the last thing to go back on, since it needs to be off to get the gear shaft in. Also, note that the plastic retainers of the gear shaft are color coded. This is important, so you make sure that you have them properly oriented.
Here is what the actuator looked like when I removed it from the seat track. As you can see it was very crusted with sand and other debris. It wouldn't move up or down.
Here I have removed just the bottom washer exposing the bearing. This bearing is what makes everything move smoothly, and it is important that it isn't damaged. Clear it well and examine for any cracks, etc..
Next to come out is the worm gear shaft and retainers. Note there position on the shaft.
From this point, my hands were greasy, so I stopped taking pictures, and started cleaning. The following pictures you will see the parts, and how they go together.


")