The Rim Reaper - 1953 Pontiac Hearse by Barnette

Thank you Peter, I will go about the brakes once I get the engine running, if the stuck valves doesn't free by Saturday I will be sealing it up and starting it and see if it shakes free. I will definitely share the video of the first fire, I look forward to shaking it up a bit, LoL.

Do the cylinders absolutely need replacing or rebuilding?
I was thinking more along the lines of greasing things up and making sure the hydraulic lines are okay and the fluid is tip top.

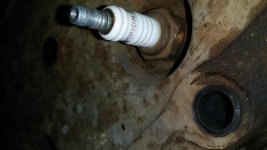
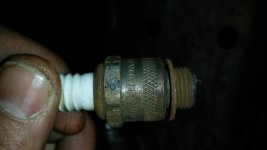
Another thing I noticed, the spark plugs, some hoses, and other things are made in Canada, was this the standard at the time or can I assume somebody has already done work on this vehicle in its early years?
 
Thank you Paul, and I appreciate your insights. Thankfully I did not ruin the spring, the picture uploaded at a different angle, but I assure I didn't move anything in there, just a quick and light brushing with a wire brush (while breathing in clean air outside the wheel well and blowing the dust away with my exhales).

By the other brake assemblies do you mean the ones behind the other wheels? Or other parts within?

I do not hold contempt to you thinking I did something stupid like that though, as I readily admit, I am not a mechanic and I will surely ask before I break things.

I did break one thing on that mission, it was the cotter pin holding the nut which holds in the hub, it broke way too easily and I will likely just replace every one I remove anywhere on the car whether they break or not.
 
If you attempt to start it before you get the stuck valve working, you are going to bend a push rod for certain, and might even bend a valve stem.
You can attempt to put brake fluid into the system, and see if it works, but I wouldn't chance it on the road, even if everything appears to be working correctly.
As for the Canadian parts, considering that they are all marked as Canadian, it is safe to assume that they are replacement parts, unless the basic chassis was manufactured in Canada. To the best of my knowledge, there were no Canadian manufactured Pontiacs until either the late 1960's or 1970's. Prior to this time frame, they were Pontiac bodies that were fitted to Chevrolet chassis and running gear.
I was referring to the other 3 brakes on the car...
 
Okay, I thought I read that before but today I talked with a guy who said he has a 53 Pontiac but it is Canadian...

Him:
I have a 1953 Pontiac, but its Canadian, the Chieftain is American Pontiac.

Me
I am not too sure that matters, yours must be a Laurentian? I think I read about those, but I didn't think they made them in Canada that far back.

What I am really looking for is the oil bath air filter, do you have many of those? The carb is approx 2-1/2" on top, I can get proper measurement if you have something that might be what I'm looking for.

Him
I have a oil bath from 239ci Flathead 6 cyl. The car is a Silverstreak.

Me
It might work, can you get a pic of it and a measurement of the port please?

BTW silver streak, though posted on many cars, was never the name of a vehicle, more like a sales pitch because of the amount of chrome they began using in that era.

Him
I know the American Pontiac cars have larger fenders, different grills and different tail lights. Its a Canadian Pontiac for sure, and its a 239ci flathead 6cyl. I will see what is there this weekend.
 
Canadian built cars have a different body serial number sequence, so it shouldn't be difficult to tell. Post of picture of the serial number. Also, if it is a Canadian built vehicle, then you can purchase from GM of Canada, a complete history of the production of the vehicle, by serial number. Pontiac is the one division that kept the most complete vehicle records of all the divisions.
If you post a picture of the hose clamp that held the radiator hoses on, I can tell you if it is an original or a replacement. Also, what brand are the spark plugs? If you look carefully at the spark plug wires, and they are original, you will find that they were silk screened with a date in code. Post the code if it is still visible.
 
Okay, here goes.

My body was made in the Euclid? Plant in Ohio by Fisher of course. It was the 173rd body of its style off that line that year, or possibly the 173rd period, it is hard to decipher as on the site I used to realize that, the guy (mistakenly by my account) says that his was ya da ya da of only 4000 - some built that year, I think in reality it would have been "at that facility".

My driver door does not have a serial tag, likely because it was made by Barnette and not a Pontiac Facility.

Is it possible to get that production info for the American built ones?

My spark plugs are Champion J-7, made in Canada.

I cannot see any dates on the wires...

My rad hose had one original clip and one more recent hose clamp.
 

Attachments

  • 20150326_210914.jpg
    20150326_210914.jpg
    90.4 KB · Views: 112
  • 20150326_211044.jpg
    20150326_211044.jpg
    85.2 KB · Views: 114
  • 20150323_194737.jpg
    20150323_194737.jpg
    90.4 KB · Views: 112
No question about it, yours is a US built Pontiac. I can't tell from the picture if the trim and paint numbers were stamped over the original embossed letters and / or numbers that were usually provided by Pontiac on the assembly line. No question about the spark plugs, they are Canadian replacements, since the originals were AC on all GM produced engines. You can contact the Pontiac Historical Services and for $65 US, they will supply you with A copy of the factory invoice or billing history card for your Pontiac, A letter decoding the options (where necessary), A copy of the dealer order form for that year, and other specific information for that year and model Pontiac (where available). This can be faxed to them along with a credit card for payment. Payment by credit card is the best option, since the card company will compute the exchange rate, and charge you this adjustment fee.
 
You are getting good and valuable advice here, I might add when it comes time for the brakes please disassemble all the lines and replace with new hose's and if possible stainless steel lines. You can buy I think 10'length and get the tube bender gadget. I use a coat hanger straightened out and make a template of the bends in the line, then bend the SS line to match the template. The wheel cylinders are easy to hone out or replace. Some wheel cylinder kits come with all the springs and the little nail looking piece. Get a good brake spoon, and spring remover. A good brand of this tool is probably $15. - $25.00. When you get all the brake parts assembled, then put the hub on and use brake tool that looks like a flat head screwdriver, but "S" shaped and adjust the star out until you hear the shoes starting to hit the hub while you spin it by hand. If its too tight, then reverse the "star" until it has just a little resistance. Then get someone to help bleed the brakes, and make sure all the air is out of the wheel cylinders and lines. Probably have to do several times to make shure its right. You might even find someone that knows brakes to help you out, this is one part of the car you want to work properly:thumbsup:
 
Thank you for the detailed explanation John, it surely helps.

I anxiously await my gasket kit, I will be putting the wheels back together for now and focus on the engine, but once that is done it is time for brakes tires and fuel lines.
 
the clean up and inspect of necessary components is never a wast of time. gives you a idea on what you need to do next. just don't take apart more then one major component at a time and you will not get lost in what your doing. the overhaul gasket set is your best bet right now with as much as you have taken apart on the engine. keep lubing that valve stem spinning the engine over and trying to rotate it by hand. it will free up.

I'm not sure that the 6 air cleaner will go on the 8 engine. one has a single barrel carb and the other a two.

when I tried to check the Pontiac registry on mine, I was told there records don't go back that far. the stop at about 1960. if you have better luck let me know how you did it.

one can be rest assured that your car was built in the USA. where Barnette would build on a car you dropped off, sending one from Canada to them and back in 1953 would not have been practical . here is a picture of the serial number on the door jam about halfway up the windshield pillar.
 

Attachments

  • 2010-04-14 IMG_3902.jpg
    2010-04-14 IMG_3902.jpg
    94.3 KB · Views: 118
Thanx Ed, I will look there for the serial, and it will be a long time before I look into the history of the car, that will be if and when I decide to restore it fully.
 
Busy day today, went to work for half a day, and was rained out for most of the afternoon, but by the evening the sun was out and I had just enough time to do a whole handful of things.

First thing I did was removed the carb, which resulted in a broken copper line from the carb to the manifold...

I am assuming it can either be welded back or replaced with a screw in type connector.
 

Attachments

  • 20150328_162234.jpg
    20150328_162234.jpg
    101.8 KB · Views: 82
  • 20150328_162249.jpg
    20150328_162249.jpg
    99 KB · Views: 81
I continued on, drain gin the radiator, which looked to contain an anti-freeze/water mixture.

I pulled off the oil filter, here is a picture of where it hooks into the engine, maybe you guys have a picture showing this area of your engine without the filter?
 

Attachments

  • 20150328_162659.jpg
    20150328_162659.jpg
    91.5 KB · Views: 82
  • 20150328_185042.jpg
    20150328_185042.jpg
    100.8 KB · Views: 82
Then I removed the manifold, what a pain some of the nuts were to get off, not sized, just not much room for a wrench to fit...

Once I had it off, I noticed the exhaust portion of it is cracked, same place on both sides, I'm not sure this will negatively affect the performance in any way, would it?

As well, what is the function of the spring - coil thing in the exhaust? Does this open 5 he exhaust once the engine is warm enough, keeping it more closed until it is warm?
 

Attachments

  • 20150328_165644.jpg
    20150328_165644.jpg
    97.3 KB · Views: 76
  • 20150328_174520.jpg
    20150328_174520.jpg
    98.4 KB · Views: 78
  • 20150328_181023.jpg
    20150328_181023.jpg
    98.8 KB · Views: 76
  • 20150328_180950.jpg
    20150328_180950.jpg
    98.9 KB · Views: 75
Finally, into the valve covers!!!

I removed the inside wheel well panel to give access for this video, here to you can see the stuck valve, lifter operating properly, spring is stuck up with the valve, what is the recommended method to un - stick this valve in this state? It has been soaking with penetrating oil for 3 days now, or more, so I am thinking light tapping , but looking for suggestions now...

Rim Reaper - 03/28/2015 - Stuck Valve:

[ame]http://www.youtube.com/watch?v=srq0FUKlm9A[/ame]
 

Attachments

  • 20150328_180346.jpg
    20150328_180346.jpg
    99.5 KB · Views: 75
Thanx Ed, I will look there for the serial, and it will be a long time before I look into the history of the car, that will be if and when I decide to restore it fully.

I found the serial on the door jamb, I was looking too low and it is painted black and was dirty, so was easy to miss...

Also, it now seems all my photos are posting upside down, must be the way my Samsung phone processes the pictures...
 
I will try to answer some of your questions, in order of how you posted them.

1) The tube that broke off looks like it goes to the carburetor choke mechanism. I don't know if this tube has been reproduced, however it is important to have it on the engine and working properly. I am not certain if it is a smaller diameter where it enters the manifold, but the easiest thing to do would be to drill out the broken part. Just don't drill it out and create an oversized hole. Also, this tube is steel, not copper, unless it was replaced at some time in the past. If the original tube isn't bent up, you might be able to send it to Inline Tube in Michigan, and they can reproduce it for you for a fee. Just need to tell them how much is broken off, and the diameter of the hole.
2) If you insist on removing the accessory oil filter, then the two holes can be terminated with 1/8" steel square head pipe plugs. This is what GM used to plug those holes.
3) The cracked exhaust manifold is a common problem, and finding a good one is difficult. It might be able to be welded, but cast iron require a very special technique, and it isn't easy or cheap. I have seen lots of people attempt to weld cast iron, but not have much success.
4) The part with the spring, is the heat riser. You can torch out the center, and then just weld up the holes. It was common for them to get stuck, and they would cause the exhaust manifold to overheat. It might be the reason that you exhaust manifold is cracked. No one can say that for certain.
5) After seeing the video, you might want to try tapping on the head of the valve with a block of wood between the valve head and the hammer. Be gentle, because you don't want to bend it. If it starts to move, make sure that you give it plenty of lubrication. If it gets stuck in the down position, it will be more difficult to get it up again.
 
I could have guess all of that. the intake and exhaust is one piece together the heat riser rusted shut and causes the manifold to get hot under it breaking it. the will fill with water if left exposed and freeze and crack also. cut the flap out of the heat riser. and pretend it's still there. your not doing to be daily driving it in the winter anyway. you may get away with welding it with nickel steel rod. don't separate the intake and the exhaust just weld it in place. it will leak through the cracks otherwise
they can be found but some think there worth a kings ransom. my spair went to BC as soon as I drag it out to washington and leave it for a border crossing. the heat riser tube can usually be trimmed on the end the broken stub either drilled or fished out and it reinserted.

the valve is another story you can see both ends work it from either side now. you may get away with placing a hammer handle dead center in the valve and taping lightly. but like Pete said you will most likely kink the head and end up replacing it or burning it out right away. your down this far time to take the spring loose and see if you can lift it up. you will need that valve spring compressor. don't play with the adjuster. just remove the keepers and let the spring stay right there and see if it will come up.

Paul and I were typing at the same time. the video shower the cam is good you see the lifter come up and rotate under the valves. and if you going to do anything keep the lifter down while your playing with the valve. the spring is up because it's held on to the valve stem with a set of keepers and as you can see moves up and down with the valve.
 
Last edited:
Back
Top